Saturday, November 2, 2013

Dish with Shell Decoration

When you are looking for cheap flower delivery on high quality flower arrangements, you can trust that you’ll receive the best flowers at the best prices. We don’t sell cheap flowers; we offer an incredible variety of beautiful, fresh flower arrangements at affordable prices. In fact, we offer more flower, plant, and gift options for forty dollars ($40) and under than any of our online competitors.

"This post was created in partnership with eAccountable. All opinions are my own." Mammaclayzee


    It is soooo good that we 
    turn back the clocks tonight...
    an extra hour of sleep!
  • The small dish we are going to create this week is formed with a slab. You could use it for a candy dish, a butter dish, or even a trinket box.I have white sand in mine and put my favourite tiny shells and fossils inside. This close up (top left) shows the texture by rolling the clay on burlap and the shades of brown and violet show up in the pattern. I thought I would try pressing  a tiny shell pattern onto the sides of the dish after I put it together. These are the shells (below right) I will try to use To start the project, you should take out 1 sheet of printer paper to make your template. Make pencil marks at 2 inches in from the edge of the paper all the way around, and then draw in the lines with a ruler. You should then cut out the corner pieces as shown (below right).  

                                                      You could use a cardboard template for more stability when you cut out the slab or you could just draw around the paper template.
Well, it is almost 2:00 am,so I'll wait until tomorrow to get out the clay.

I'm back...
Slice off about a 1 1/2 inch slab of clay from your block. Wedge it well and roll it out into a 1/4 inch thick slab. Use your depth sticks for a cleaner edge to your slab, and roll it out enough to cover the template as shown.
Smooth out your template on top of the slab. It should stay put from the moisture in the clay. Cut out the corner pieces of the clay and straighten your clay edges to match the template. Use a ruler as you cut to ensure straight edges.
Fold up each side to make a box shape, patting the outsides with the ruler or a paddle to straighten any waviness in the clay.
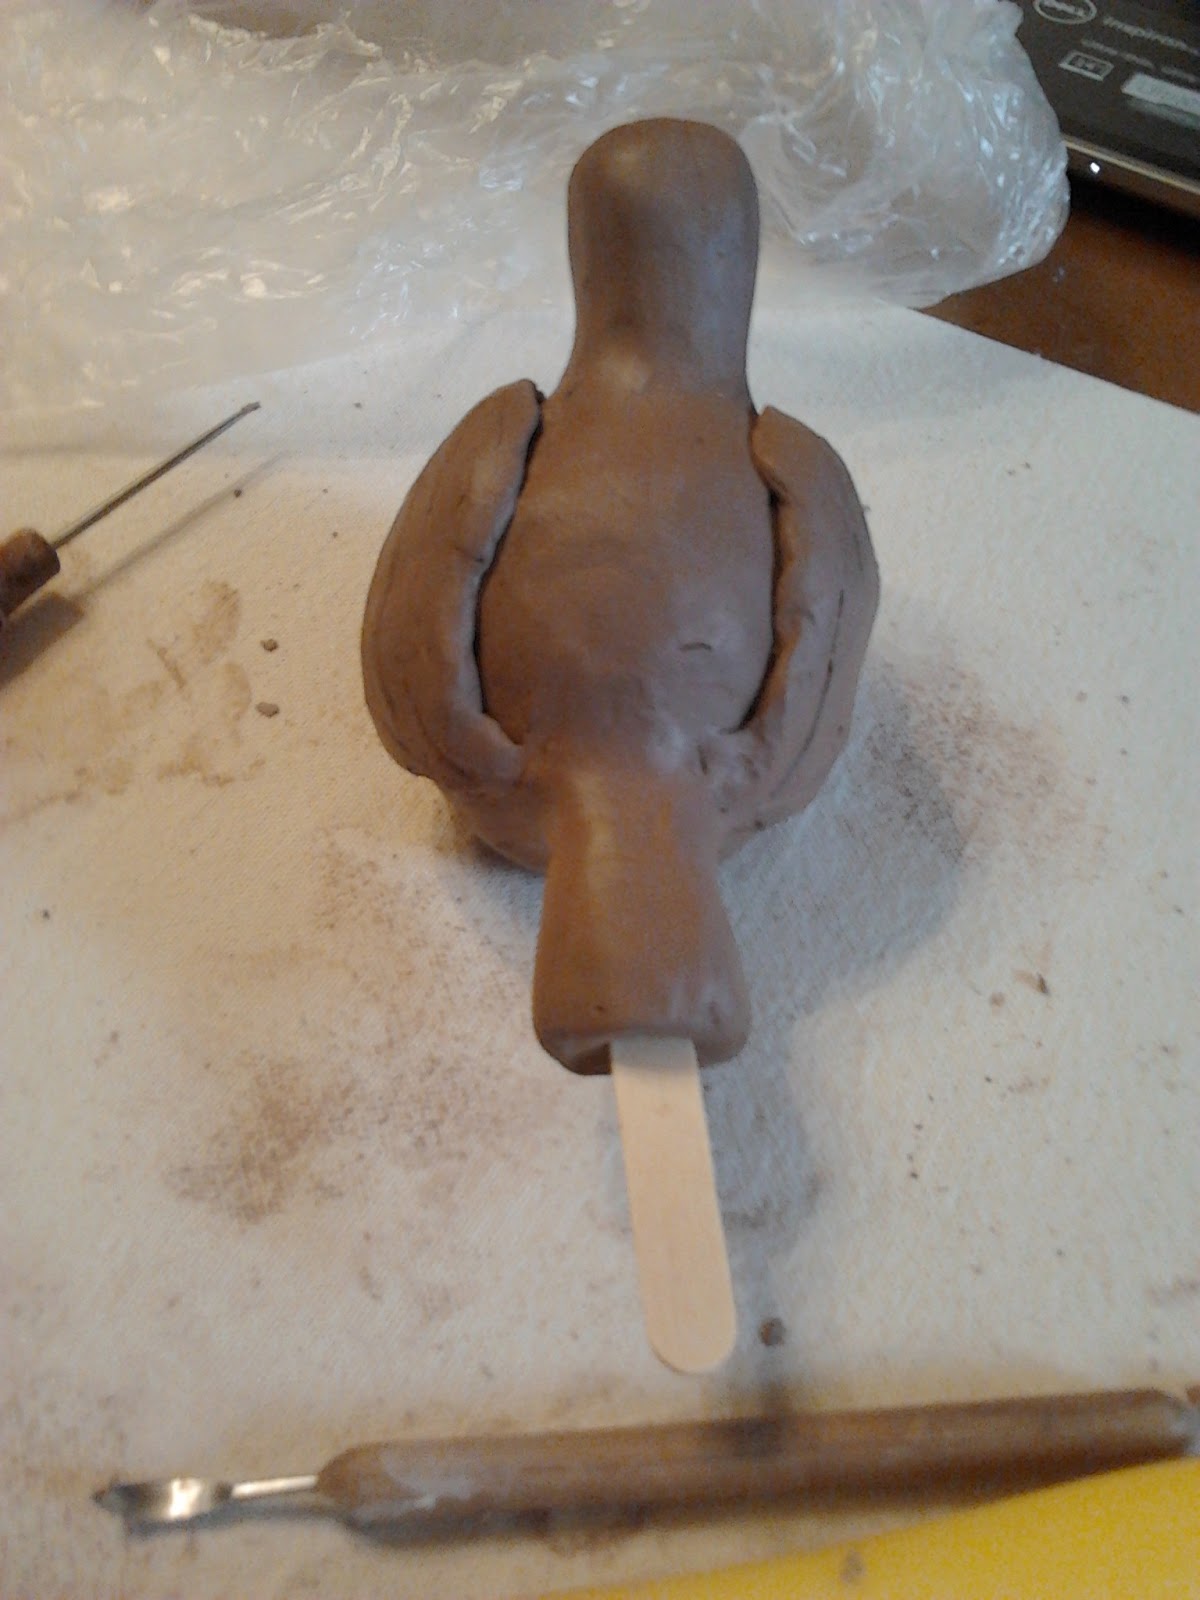
At this point, I took a tiny shell and pressed it firmly into the outside edges of the dish to create a pattern, and I pressed my favourite shell into a pattern on the base, making 3 shell impressions..


I then took extra clay (marble size) and pressed it into a fossil of a shell that created a sprig, a tiny clam shell mold. After I took it out, I cut off the excess clay, scored and slurried the bottom and attached it to the inside base of the dish. I added 3 sprigs in all to create a pattern.


The next step was to score and slurry all four corners to complete the sides of the dish.
Press firmly to attach each side.
I covered the dish with a grocery bag overnight for the clay to become leather hard. The last step is to attach feet on the bottom of the dish.
Roll 4 pieces of clay into 4 marble sized balls, score and slurry each foot and each corner of the base where you plan to attach it. Press each foot firmly on the base and turn the dish upright. Apply pressure to the dish to slightly flatten each foot so that it sits evenly.

And there you have it, ready to dry, fire, and glaze. I think I'll use this one for fancy soaps.
See you next week.


Sunday, October 27, 2013

Slab and Coil Maple Syrup Pitcher


Still on the kitchen theme, I thought we'd create a maple syrup pitcher with the slab and coil method combined. You will need to slice off about a 1 1/2 inch slab of clay from your block.Wedge your clay and flatten it out on your board. Roll it out lengthwise to make a long slab. Use your sticks on the long sides to force the clay to spread out lengthwise to about 1/4 inch thickness. Turn the slab over in the process.On one end of your slab, cut out a cookie base about 2 1/2 inch-3 inches in diameter.Make sure your remaining slab is long enough to stand up and sit around the top rim of your base. Make sure you score the top edge of the base and the edge of your slab, brush slurry on both parts and firmly press the slab onto the base to create a cylinder (third picture on the right). Cut off any excess  from the slab so it leaves a neat seam, not overlapping.Add some slurry, press the seam together, and smooth it out with your finger. Smooth the seam at the base as well. If you are out of clay, slice off another 1 inch slab for the coils. If you have leftover clay, wedge it and squeeze some into a 1/2 inch coil. Place both your hands over the coil and roll the clay as you move your hands away from each other, trying to keep the same pressure and movement on each hand. Keep rolling the coil as it gets thinner, and move your hands to the thicker areas trying to make the whole coil uniform.
Make sure you score and slurry each coil as you attach it. Place the coils on the inside top edge of the cylinder, so the neck curves in like a bottle. Press firmly on each added coil and then smooth out the coil bumps on the outside with your finger or a sculpting tool. A rib tool works well to smooth away any finger marks.You can see in the photo on the right that the coils are curving in to make a bottle neck. Keep a few fingers inside for support as you blend in the coil bumps on the outside. After you have smoothed out the outside.coil bumps, use a sponge that is just barely damp to smooth any uneven areas. Attach a top rim coil to the outside edge of the coil below, press it firmly in place and blend in both the outside and inside coil bumps. This top coil should flare out (photo below right). If you have enough clay left, form it into a 2-3 inch ball for pulling out a handle.


Pour about 3 inches of water into a bowl, yogurt, or ice-cream container to work over. Shape your ball into an oblong shape and wet the long end. Hold on to the dry end with your other hand. Wet the long end well, and pull the clay out toward you, adding water so it slides easily as you pull. It will form into a handle shape that you can then cut off and attach to your little jug. (photos left and below).


I had an indent on one side of my pitcher, so I took some leftover clay and rolled it out quite thin, cut out a maple leaf shape, scored and slurried the back, and the pitcher, and attached it to cover the flaw. Clay is very forgiving, and many blips can be altered or hidden. My final piece is on the right, however, I probably will do more sponging before it completely dries.


Sunday, October 20, 2013

Creating a Spoon Rest


I thought it might be fun  to make a few useful kitchen items In this lesson, we will go through the steps to create a Bunny Spoon Rest like the one on the right. You will need to slice off about a 1 1/2 inch slab of clay from your block. Re-tie your clay block securely and wedge your clay well.
Flatten it out on your board and then roll it out into a 1/4 inch thick rectangle until it measures about 9 to 10 inches in length and  about 4 to 5 inches wide. Take a knife or pin tool and cut it out to make an hourglass shape. I think of a butternut squash when I cut out the shape so that the top, which will be the bunny's head, is smaller than the bottom, where the spoon will rest. You should have some leftover  pieces for the bunny nose, the eye, scarf, and the ears. If you don't have enough, prepare and roll out a small slab from your block.
I just started one a few minutes ago, and just kept working and putting it together without thinking about taking photos, so I'll have to walk you through the added parts of this bunny
The first thing I did was to bend up the spoon end and smoothed it around inside to hold its shape. I smoothed the rim until I was happy with it.
Then I cut an arc shape piece for the scarf. Be sure to score the underside of the scarf and the base, add slurry or slip and press it firmly in place.
Use two pieces that look like 2 inch leaves like elm leaves. Score, slip, and ach one just flat at about 1 o'clock at the top back of the bunny's head. Push it on firmly especially at the top and blend it in to the top of the head. This ear should lie flat down the back of the head to the scarf.
Bend the second ear shape in half around your little finger so that it looks like a bent ear, pinched in a little, but still open enough to see the inside. Score and slip, and attach it firmly on top of the first ear. Blend it in at the top to become part of the head.
Take a pea size piece of clay and roll it to form the eyeball. Press in a tool or end of a Bic pen to make the hole for the eye. Press the tool in firmly to make a dent about 1/2 inch from the edge of the ear. Score, slip, and press the eyeball in. Make a tiny coil shape, less than 1/2 inch long, score and slip it on one side, and press it over the eyeball on a diagonal to create the eyelid. Press firmly on the back and smooth it into the face. Small scores with a small knife on the bottom end of the eyelid create the look of eyelashes.
For the bunny nose, take two large pea shapes, like marbles, formed into teardrop shapes the same size and pinch them together and pinch them into a point to attach to the front left of the face at about 9 o'clock. Score and slip and press firmly, than blend the nose onto the front edge of the face. Add a tiny ball in the top middle of the nose to get the bunny look. Well, mine needs more smoothing with a damp sponge and I will add a few more lines tomorrow, and then I'll set it aside to dry.

Sunday, October 13, 2013

A Turtle Ocarina

 Welcome back! I did manage to make a sound recording of the mourning dove whistle from last week, but now I just have to figure out how to embed it into this blog. An ocarina makes various sounds when blown depending on how many of the holes are covered. This is my attempt at a turtle ocarina. He still needs a little tweaking and smoothing, but you get the idea .I will go through the steps with you tomorrow, now that it is midnight!....


See you then.


Before I start, I will try to embed the sound recording for the mourning dove whistle below.


Well, it is a little bit large, but I better not fiddle with it...leave well enough alone.
Okay,
Slice off a slab of clay about 1 inch thick from your block, wedge it well, and form it into an oval ball shape, like a lemon. If it is too large, slice off one end and save in a baggie for the smaller parts later. Reshape your lemon and then slice it lengthwise through it, but not directly in half. Slice it about 1/2 inch in from one side, so the other side is about 11/2 to 2 inches deep.


Take the smaller side and roll it out on your board to about 1/4 inch thick. Cover it and set it aside.
Cup the larger side in your hand and scoop out the center with a melon baller or small spoon until the outer wall is about 1/4 inch thick.
You need to smooth out the interior chamber with your finger, and then pinch all around until it fits onto your base, or a close fit, as shown.
Trim the base to fit.
Now take some of the leftover clay and shape and roll it into a sausage shape about 3 inches long.
Flatten it with the rolling pin, and cut it into 5 pieces, 4 for the feet, and one for the tail.
Shape the 2 bottom feet or flippers each into a rectangle shape, then score and slurry them and slurry the base where you will attach them. With the two top flippers, I stretched and bent them to look more like flippers, then I scored, slurried, and attached them to the base, pressing them firmly and then smoothing them in. Score around the rest of the base where you are going to attach the turtle's back, and score the rim of the turtle's back too.

Take the last small piece that you cut and form it into a triangle shape for the tail. This will also  be the mouthpiece so it could be a little thicker than 1/4 inch. Score and slurry the end and attach it firmly between the two lower flippers on the base.Let it sit and firm up for about 1/2 hour before you attach the top to the base.
While you wait, you could form the turtle's head with a piece of your leftover clay. Form a small oval ball about 1/2 inch in diameter and attach it to the front of the shell.
Smooth it into the shell to hide the seam and extend it to look like a neck.
Slurry the scored rim of your shell and slurry the base. Attach firmly and hide the seam by smoothing with your finger or a small tool.
Insert a nail file into the tail until it reaches part way into the hollow chamber and leave it there while you create the bevel.
Turn him over and make a hole with your pin tool or large needle straight down into the hollow chamber until it touches the nail file. The hole should be about 1 inch from the base of the tail.Make the hole larger and peel out the excess clay around the hole, so that a regular pencil fits in. Put the pencil (no eraser end) into the hole, bend it toward the turtle's head at a 45 degree angle, and firmly press as you drag it out of the hole. Now, move the nail file out and wipe off any excess clay bits. Sometimes you will need to push the nail file in and out of the mouthpiece to get a clear sound. This picture shows the bevel side. After you get your whistle to blow, place your turtle in a plastic bag overnight. We'll complete the other ocarina holes tomorrow.
Well, Thanksgiving was great and a lot of fun. Now, back to the ocarina. The picture on the left shows how I added the four ocarina holes to the turtle's shell. I used a shish-ka-bob stick and pushed each one in as I twirled the stick, making each hole about 1 inch above each flipper. When you blow the ocarina, with all four holes closed, you will hear the same sound as when it was just a whistle, but as you lift one finger at a time, until all four holes are open, you will hear a little tune. I will upload the turtle ocarina's voice as soon as I record it.
Let the ocarina dry completely on a shelf. If you would like to create a turtle shell pattern, there are several choices The shell design could be painted on prior to the first firing if you use under glazes. I'll talk more about this on the glazing tab above. My favourite method would be to paint the entire top of the shell with a light mossy green under glaze and then scratch on the design right through the coloured shell. This technique is called sgraffito and it allows the colour of the clay to show through as the design. Or, after the first firing, you could choose various glazes to create the shell pattern and fire the ocarina again. I will go into more detail when I set up the glazing tab.
See you next week!


SEO Services & ToolsSubmit Express

Sunday, October 6, 2013

Create a Whistle


I thought it would be fun to create a whistle. I have made quite a few over the years, but I have given most of them away as gifts. I have three left to glaze and fire, so the pictures I have added are bisque fired whistles.

Bisque loon whistle
Bisque wolf whistle
Trio of bisque whistles
Be sure to have a selection of tools handy, your water dish, and your container of slurry or slip clay.
You only need a small amount of clay to produce a whistle, a ball about the size of a lemon will do.
Slice it off of your block, wedge it,  and then shape it into a ball. Take your slicing wire and slice the ball in half so that you have two equal halves to work on. Cover one half with plastic to keep it pliable for later, and scoop out the centre area of the other half. I find that a melon baller works well, but be sure to leave about a 1/4 inch of clay left on the outside wall. If you hold the outside cupped in your hand as you scoop. it should hold its shape as you work on it. Save all of the scooped out bits in a plastic baggie to use later to create whatever creature you plan to make. I will try to make a bird whistle with my ball of clay.
Now that you have finished scooping, smooth out the inside chamber with you fingers. Don't add water, or it will get floppy.
Complete the other half in the same way, scooping out and then smoothing the inside chamber.
Let it dry out a bit if it is too wet, and when firm, score the rims of each half with a pic tool or small knife trying to scratch in a checkerboard pattern. Add  slurry to both rims and attach the two halves back together, lining up the rims to form your ball again.


Now you have the basic whistle with the inside chamber. The bigger the chamber...the lower the note (voice of the whistle) will be.
Set the basic whistle aside to firm up and decide on your creature. For a bird like mine, you will need a small oval for the head, two flattened wing shapes for the sides, and a flattened wedge shape to make the tail. The tail also serves as the mouthpiece. Score all of your forms that you are going to attach, add slurry, and score and slurry the place of attachment on the whistle. Press on firmly and smooth out the seams. You can add more detail later. Once the tail is attached, find a popsicle stick or a nail file to create the mouthpiece opening. Push the popsicle stick (nail file) up into the tail piece and straight in to the chamber (you will feel that it is hollow). Push in about half way into the chamber and leave it there (see photo right).
Take your pin tool and make a hole straight down into the chamber about 1/2 inch in from the base of the tail. You will feel the pin tool hit the popsicle stick or file. Carefully make the hole bigger with the pin tool as you discard the peeled away clay. Make the hole about the size of a pencil end.
Use a regular pencil (no attached eraser) and put the pencil down into the hole. Bend the pencil firmly toward the head of the bird on a 45 degree angle, and with firm pressure, drag the pencil out of the hole to create a bevel. This creates the whistle sound when you blow in the mouth piece. Take out the popsicle stick or file and try your whistle. If there is any sticky clay in your mouthpiece, it may not whistle properly. You may have to reinsert your stick or file to dislodge any sticky bits. Don't get discouraged if your creation doesn't sing right away. I have had a few that caused heartache, but eventually I was able to produce a good sound. I trimmed the tail and added details so it would resemble a bird, (photo below), and you can see the bevel hole in the bottom photo.
Voila!...I have a mourning dove.

As soon as I figure out wave files, I'll upload this little guy's voice so you can hear it. Maybe we should try a turtle ocarina next time,
See you then.